































How to Set Up Your First Vape Kit: A Beginner's Step-by-Step Guide
Buying your first vape kit is only the beginning. Once you have chosen a suitable device, the next step is learning how to set it up correctly. Fortunately, most modern pod and starter kits are designed to be straightforward, even if you have never used a refillable vape before.
Buying your first vape kit is only the beginning. Once you have chosen a suitable device, the next step is learning how to set it up correctly. Fortunately, most modern pod and starter kits are designed to be straightforward, even if you have never used a refillable vape before.
Step 1: Check Your Vape Kit
Before setting anything up, take everything out of the box and check that you have all the required components.
A typical beginner pod kit may include:
-
Vape device or battery
-
Refillable or prefilled pod
-
USB charging cable
-
Replacement pod or coil on some models
-
User instructions
Check the device and pod for any visible damage. If anything appears cracked, leaking or damaged, don't use it.
It's also worth reading the manufacturer's instructions because pod designs and controls can differ between models.
Step 2: Charge the Battery
If you've chosen a rechargeable vape kit, charge the battery before using it.
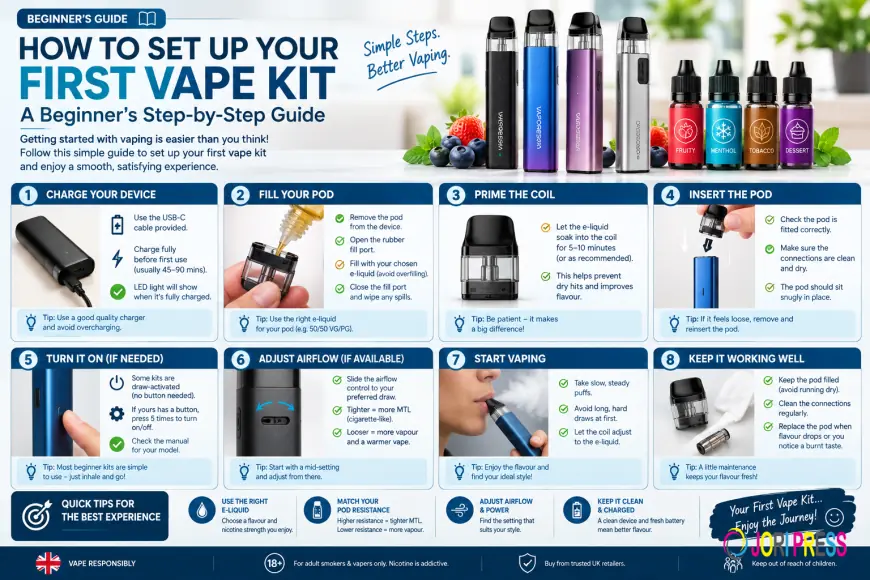
Connect the supplied charging cable to the device and a suitable power source. Many modern pod kits use USB-C charging.
Don't leave a vape charging unattended or overnight, and stop using the device if the battery becomes unusually hot, swollen or damaged.
Once the battery indicator shows that the device has sufficient charge, disconnect it from the charger.
Step 3: Prepare the Pod
The next step depends on whether your kit uses a refillable pod, replaceable coil or prefilled pod.
For a Refillable Pods, locate the filling port. Depending on the design, the filling port may be underneath a removable mouthpiece, beneath a silicone plug or on the side of the pod.
Remove the relevant seal or plug and keep it somewhere clean while filling.
If you're using a prefilled pod, simply check that the protective packaging or seals have been removed according to the manufacturer's instructions.
Step 4: Fill the Pod with E-Liquids
If your vape uses a refillable pod, choose an e-liquids that is appropriate for the device.
Slowly fill the pod through the designated filling port. Avoid getting e-liquid into the central airflow chimney, as this can cause leaking or flooding.
Don't overfill the pod. Leave a small amount of space where recommended by the manufacturer.
Once you've finished, securely close the filling port and wipe away any excess e-liquid from the outside of the pod.
If nicotine-containing e-liquid gets on your skin, wash the area thoroughly with soap and water. Keep e-liquid away from children and pets.
Step 5: Let a New Coil or Pod Saturate
If your kit has a new coil or integrated-coil pod, don't immediately start vaping after filling it.
The e-liquid needs time to soak into the coil's wicking material. This helps prevent a dry hit and can improve the initial flavour.
Many manufacturers recommend waiting several minutes after filling a new pod. Follow the specific instructions supplied with your device.
This is sometimes called priming the coil.
Step 6: Insert the Pod
Once the pod has been filled and, where necessary, allowed to saturate, insert it into the vape device.
Most modern Vape Starter kits use a magnetic connection or a simple push-fit design. Make sure the pod sits securely and is correctly aligned.
If your device has an adjustable airflow control, start with the manufacturer's recommended setting. You can make small adjustments later if your model allows it.
Step 7: Turn the Device On
Some beginner vape kits activate automatically when you inhale, while others use a button.
If your device has a power button, check the instruction manual for the correct activation method. Many devices use multiple clicks to switch the device on or off.
Don't press the button repeatedly without the pod installed, and never use a damaged device.
Step 8: Take Your First Puff
Once everything is ready, take a gentle puff rather than a very long or forceful inhale.
If you're using a mouth-to-lung pod kit, draw the vapour into your mouth first and then inhale. This style is generally familiar to people who are transitioning from traditional cigarettes.
Don't take repeated puffs immediately if you're new to vaping. Give yourself time to understand how the nicotine strength and device feel.
If you experience dizziness, nausea, headache or other unpleasant symptoms, stop using the product.
Step 9: Check for Leaks
After your first few puffs, inspect the pod and device.
A small amount of condensation around the pod connection can be normal, but visible e-liquid leakage should be addressed.
Remove the pod and wipe the connection area with a dry tissue or cloth. Check that the pod is correctly fitted and that the filling seal is closed properly.
Persistent leaking may indicate an unsuitable pod, damaged seal, overfilling or another issue. Consult the manufacturer's instructions rather than continuing to use a faulty device.
Step 10: Maintain Your Vape Kit
Setting up your first vape is easy, but regular maintenance will help keep the device working properly.
Keep the pod and connection area clean, refill before the pod becomes completely empty and replace the pod or coil when performance noticeably declines.
Signs that a pod or coil may need replacing include:
-
Burnt or unpleasant flavour
-
Noticeably weaker flavour
-
Reduced vapour production
-
Gurgling or persistent leaking
-
E-liquid tasting different from normal
Always use compatible replacement pods or coils recommended for your particular vape kit.
Choosing the Right E-Liquid
Your e-liquids choice should match your device.
Many beginner-friendly pod kits are designed for nicotine salts e-liquids, while some devices can also accommodate suitable freebase e-liquids.
Don't assume every e-liquid works with every vape. Check the manufacturer's recommended resistance and e-liquid type before filling your pod.
In the UK, nicotine-containing e-liquids sold to consumers are subject to specific packaging, capacity and nicotine-strength requirements.
Final Thoughts
Setting up your first vape kit doesn't have to be complicated. From charging the battery and filling the pod to allowing a new coil to saturate and checking for leaks, following a few basic steps can make the process much easier.
If you're choosing your first device, start with a simple rechargeable pod kit rather than a complicated advanced setup. Once you're comfortable with the basics, you can explore different pod resistances, airflow settings and e-liquid flavours where compatible.
For more help choosing a suitable first device, see our Best Vape Kits for Beginners UK 2026: Top Starter & Pod Kits guide.
What's Your Reaction?
 Like
0
Like
0
 Dislike
0
Dislike
0
 Love
0
Love
0
 Funny
0
Funny
0
 Angry
0
Angry
0
 Sad
0
Sad
0
 Wow
0
Wow
0