


How-To Plan and Install Louvred Roof Pergolas for Maximum Functionality
A louvred roof pergolas is more than just a decorative feature—it’s a functional, versatile extension of your living space

Have you ever looked at your outdoor space and wished you could control the sunlight or shade with a simple tilt of a lever? Are you curious about creating a stylish yet functional pergola that adapts to ever-changing Australian weather conditions? If you answered yes to these questions, then you’re in the right place.
In this blog post, we’ll explore how to plan, design, and install a louvred roof pergola for maximum functionality. You’ll discover everything from essential pergola design considerations to the best materials for Aussie climates. Plus, we’ll tackle some common questions, like whether you need council approval and how long a typical louvre roof installation takes.
By the end, you’ll feel confident about creating a bespoke pergola that suits both your budget and design preferences. Whether you’re dreaming of a cosy space for family BBQs or a sleek entertainment zone for gatherings, a louvred roof pergola just be the perfect solution to enhance your outdoor lifestyle.
Understanding Louvred Roof Pergolas
What Are Louvered Pergola Designs?
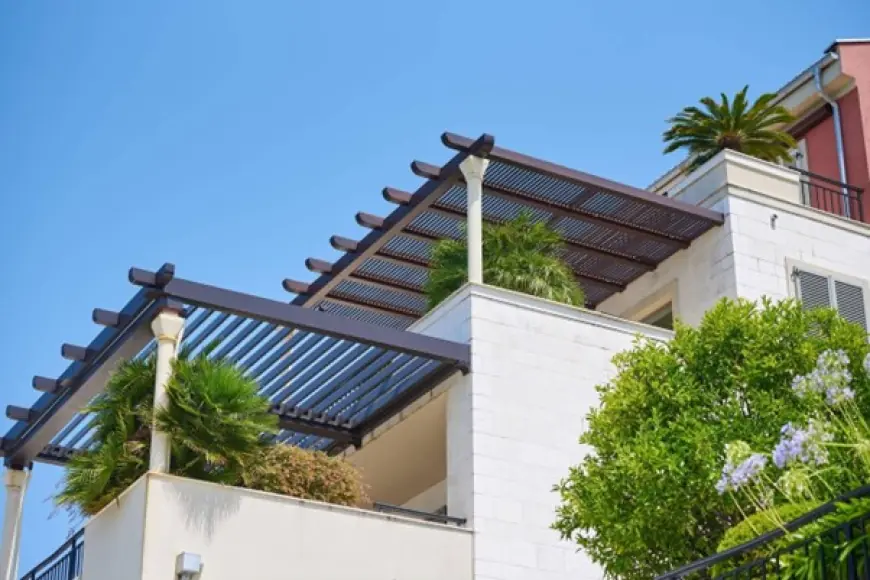
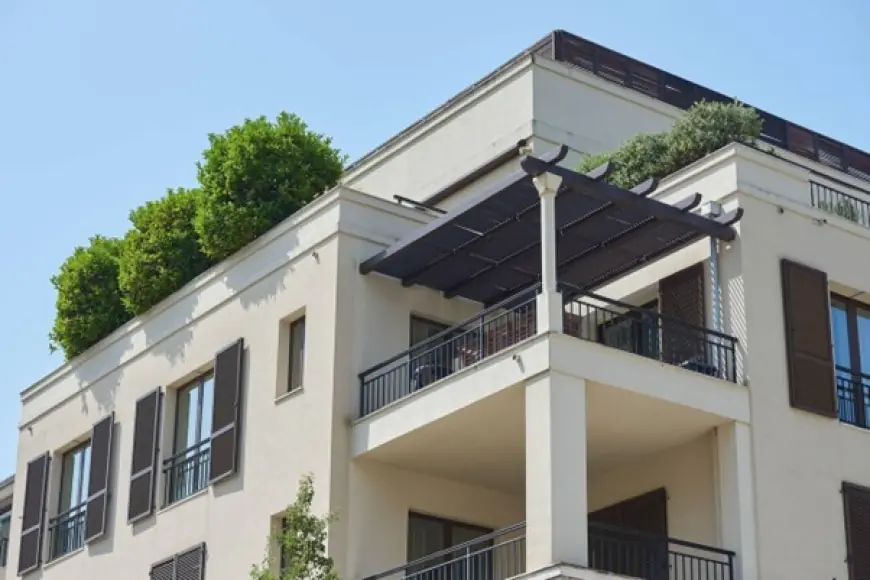
A louvered pergola design features adjustable slats—often referred to as louvres—that allow you to manage how much sunlight, shade, or airflow enters your outdoor space. Picture a pergola where the roof isn’t just fixed in one position; instead, every slat can be tilted at various angles. This means you can enjoy a bright, sunny spot in the morning, then shift the louvres slightly in the afternoon to create a cooler, shaded environment.
In Australia, louvered pergola designs have been gaining popularity for their adaptability. When the slats are fully closed, the pergola offers protection from sudden rain showers, which can be quite the lifesaver if you’re hosting an outdoor event. At the same time, the sleek look of these adjustable slats can transform even the plainest backyard into a stylish retreat.
These pergolas come in various configurations to suit different preferences. You can opt for a fully motorised system with a remote control or choose a manual handle if you’d like to keep things simple and more budget-friendly. Whether you’re leaning towards a modern aluminium finish or a natural timber look, a well-planned louvered design can complement any style you prefer.
Benefits of a Bespoke Pergola
One of the biggest upsides to a bespoke pergola is the potential to amplify your property’s value. Because it’s designed to integrate seamlessly with your landscaping and architecture, it stands out as a premium addition you won’t find in many other homes. Not to mention, a bespoke pergola can reflect your personality and aesthetic sense, whether you adore minimalistic lines or prefer a rustic vibe.
Another thing to note is the opportunity to carefully pick materials suited to your climate. For example, if you live close to the coast, you might prefer corrosion-resistant aluminium. On the other hand, if you want something warm and traditional, you could choose a high-grade timber that’s been specially treated for Australian conditions.
Step-by-Step Guide to Louvre Roof Installation
Preparing the Site & Groundwork
Before you break out the power tools, you’ll want to ensure your site is prepped correctly. Start by confirming your pergola’s precise location, accounting for factors such as sunlight exposure and proximity to existing structures. Mark out the area with stakes and string lines, then remove any obstructions like rocks, vegetation, or old paving. Next, level the ground or create the required foundation if the design demands concrete footings.
If you’re working with an uneven landscape, you might need to invest in some form of grading or retaining walls. This not only creates a firm base for the pergola posts but also helps manage drainage, which is crucial during Australia’s unpredictable downpours. Proper site preparation may take a bit of extra effort, but it lays the groundwork—literally—for a stable, durable pergola.
Once your site is clear and level, you can proceed with setting the posts. Whether you choose timber or aluminium, make sure to use correct anchors or footings. Double-check everything is plumb and square. Proper alignment at this stage makes the rest of the build more straightforward.
Building the Pergola Structure
With the posts securely in place, you’ll start installing the horizontal beams that form the pergola’s roof frame. In timber constructions, these could be wooden joists, whereas in aluminium builds, they’re typically lightweight but strong beams designed to hold the louvres. Keep a keen eye on measurements to avoid any misalignment that could compromise the final result.
If you’re doing a DIY project, follow the instructions from your pergola supplier rigorously. It’s critical to use the recommended screws, brackets, or bolts, as these components ensure the structure can withstand strong winds. Some homeowners might decide to use decorative elements like corbels or end caps to add extra flair. Feel free to get creative, but never compromise structural integrity for style.
As soon as your basic frame is complete, you’ll want to cross-check everything for wobbliness, ensuring it’s stable and sturdy. Remember that slight adjustments are easier to make at this stage than after you’ve installed the louvres and additional features.
Fitting & Adjusting Louvres
Now comes the fun part: installing the louvres. Depending on how your system is designed, you may fit each louvre into pre-drilled holes or guided channels. If you’re using a motorised setup, align each louvre with the mechanism specified by the manufacturer. Taking the time to align them perfectly ensures a smooth tilting action in the future.
It’s wise to conduct a small test once a few louvres are in place. Gently tilt them to confirm they move freely without sticking. Adjust any brackets, pins, or connecting rods as needed. If you’re dealing with manual louvres, make sure the handle or lever is easy to access and operates without too much force. Regular lubrication of moving parts is key to a smooth experience, so keep this in mind as you continue the build.
Once all louvres are installed, do a final check for gaps. When closed, the louvres should create a watertight seal—or as close to watertight as the design allows. This step is particularly important for pergolas intended to protect seating areas or outdoor kitchens from rain.
Electrical & Automation Setup
If you’re adding lighting, heating, or automated tilt systems, it’s crucial to work with qualified electricians or follow local codes if you’re doing it yourself. Wires can be hidden within the pergola’s beams, giving you a clean, uncluttered look. Many homeowners also choose to install outdoor power points for appliances like fridges or even a TV setup if they plan to watch footy under the pergola.
Automation adds a layer of convenience too. You could install a fully automated system with integrated sensors that detect rain, wind, or temperature changes, instantly adjusting the louvres as needed. Some systems are app-based, letting you control everything from your phone. With modern technology, you can also set presets. For instance, one preset might shut the louvres at sunset, while another might open them slightly at dawn.
Always factor in the general safety of outdoor electrical installations. Waterproof fittings and properly rated wiring are essential for preventing weather-related damage. Consult a qualified professional to ensure compliance with Australian standards, especially in regions prone to severe weather events.
Conclusion
Ultimately, a louvred roof pergolas is more than just a decorative feature—it’s a functional, versatile extension of your living space. Throughout this guide, we’ve broken down the process of designing, installing, and maintaining a pergola that adapts to your specific needs. From the type of framework to the choice of louvres, each step you take helps you create the outdoor oasis you’ve always envisioned.
Much like any home improvement project, the key to success lies in thorough planning and informed decisions. By considering council regulations, selecting materials suitable for tough Australian conditions, and thinking carefully about extras like lighting and heating, you set yourself up for smooth sailing when it’s time to build. With a bit of elbow grease—or expert assistance—you can achieve a bespoke pergola design that works year-round.
So, are you ready to transform your backyard into a flexible retreat where you can control the amount of sunlight with a mere tilt? By following the steps outlined here, your dream of a modern, comfortable, and stylish outdoor haven is well within reach. Embrace the potential of a louvred roof pergola, and watch your alfresco life truly flourish.
What's Your Reaction?
 Like
0
Like
0
 Dislike
0
Dislike
0
 Love
0
Love
0
 Funny
0
Funny
0
 Angry
0
Angry
0
 Sad
0
Sad
0
 Wow
0
Wow
0