


Derma Pen Sterilization: How to Clean
The primary reason for rigorous Derma pen sterilization is to prevent bacterial, viral, or fungal infections.
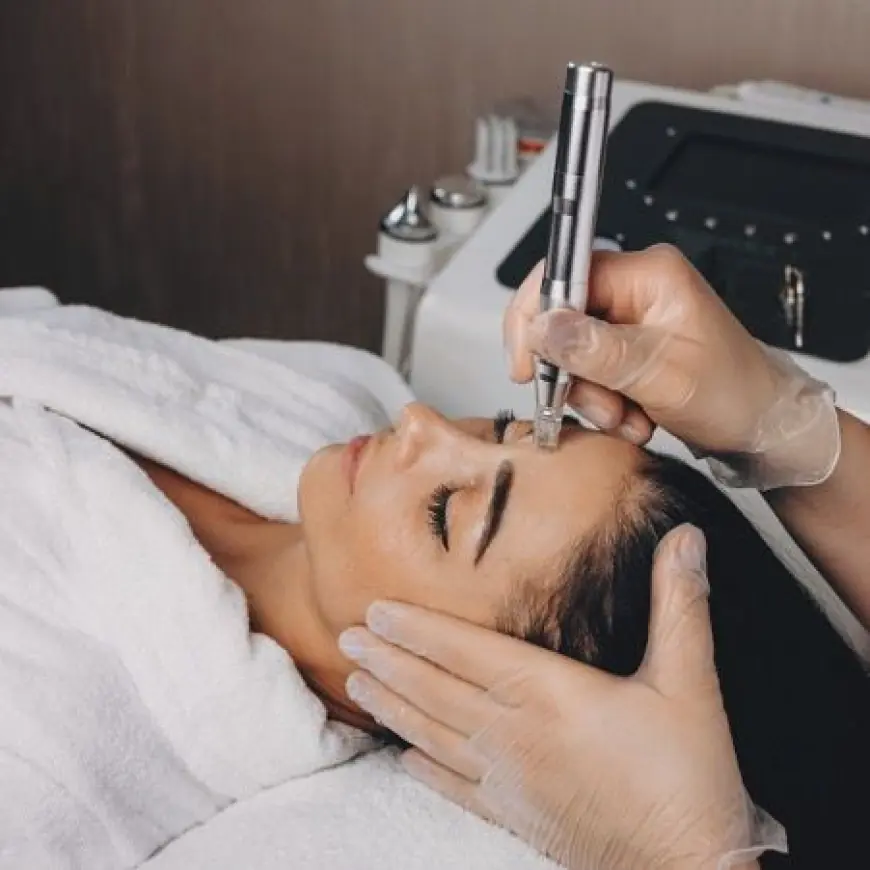
Microneedling has emerged as a revolutionary skincare treatment, celebrated for its ability to address a myriad of concerns, from fine lines and wrinkles to acne scars and hyperpigmentation. At the heart of this transformative procedure is the derma pen, a handheld device equipped with tiny, sterile needles that create controlled micro-injuries on the skin's surface. While the benefits of stimulating collagen and elastin production are widely recognized, the paramount importance of hygiene and proper sterilization cannot be overstated. Neglecting to meticulously clean and sanitize your derma pen, whether for professional or at-home use, can lead to serious skin infections, cross-contamination, and compromised results. This guide will walk you through the essential steps and best practices for derma pen sterilization, ensuring a safe and effective microneedling experience.
The Critical Role of Derma Pen Hygiene
-
Preventing Infection: The primary reason for rigorous Derma pen sterilization is to prevent bacterial, viral, or fungal infections. Microneedling creates microscopic channels in the skin, providing a direct pathway for pathogens to enter if the device is not impeccably clean. These infections can range from mild irritation to severe, requiring medical intervention and potentially leading to permanent scarring.
-
Avoiding Cross-Contamination: For professionals, proper sterilization protocols are crucial to prevent cross-contamination between clients. Even for at-home users, thoroughly cleaning the device after each use prevents the transfer of bacteria from your own skin to subsequent sessions or to other areas of your body.
-
Optimizing Results: A clean derma pen ensures that the micro-injuries are precise and sterile, facilitating optimal healing and collagen production. Contaminated needles can cause inflammation, prolong healing time, and ultimately diminish the desired aesthetic outcomes, making the treatment less effective.
-
Protecting Your Investment: Proper cleaning and maintenance also extend the lifespan of your derma pen. Regular and correct sterilization prevents residue buildup and corrosion, ensuring the device functions optimally for longer.
Understanding Derma Pen Components and Cleaning Needs
A typical derma pen consists of a main body and a disposable needle cartridge. Each component requires a specific approach to cleaning and sterilization, with the needle cartridge being of particular focus due to its direct contact with the skin.
Key Components and Their Care
-
Disposable Needle Cartridges:
-
Single-Use Only: It is absolutely critical that needle cartridges are strictly single-use. They are designed to be used once and then immediately discarded. Reusing needle cartridges, even after cleaning, poses an unacceptable risk of infection and dulls the needles, making the treatment less effective and potentially more damaging to the skin. Each new microneedling session requires a brand-new, sterile, individually packaged needle cartridge.
-
Immediate Disposal: After each use, safely detach the used needle cartridge and dispose of it in a sharps container or a puncture-proof container (like a thick plastic bottle) before placing it in the regular trash. This prevents accidental needle sticks.
-
-
Derma Pen Handpiece (Main Body):
-
Surface Cleaning: The main body of the derma pen, which does not directly contact the skin with its needles but can be touched during the procedure, requires thorough disinfection. This surface should be wiped down after every use to eliminate any residue or contaminants.
-
Non-Autoclavable: Most consumer and many professional derma pen handpieces are electronic and cannot be autoclaved (heat sterilized). Therefore, chemical disinfection is the appropriate method for this part of the device.
-
Step-by-Step Derma Pen Sterilization Protocol
Following a systematic and thorough cleaning protocol is paramount. This procedure applies primarily to the derma pen's handpiece, as needle cartridges are always single-use.
The Cleaning Process
-
Step 1: Immediate Post-Treatment Cleanup:
-
Unplug and Detach: As soon as the microneedling session is complete, unplug the Derma pen from its power source (if corded) and carefully detach the used needle cartridge. Dispose of the cartridge safely as described above.
-
Wipe Down Excess: Using a clean, disposable wipe or gauze, gently wipe away any visible blood, serum, or other debris from the surface of the derma pen handpiece. Do not submerge the device in water.
-
-
Step 2: Disinfection:
-
Choose an Approved Disinfectant: Use a high-level disinfectant specifically approved for non-porous surfaces of medical devices. Common and effective options include:
-
70% Isopropyl Alcohol (IPA): A widely available and effective disinfectant. Spray directly onto the device or apply generously to a clean wipe and thoroughly wipe all surfaces.
-
Medical-Grade Disinfectant Wipes: Many brands offer pre-saturated wipes designed for medical equipment. Ensure they are broad-spectrum (effective against bacteria, viruses, and fungi).
-
Hospital-Grade Surface Disinfectants: Follow the manufacturer's instructions for contact time.
-
-
Thorough Wiping: Saturate a clean, lint-free cloth or paper towel with your chosen disinfectant. Meticulously wipe down the entire surface of the derma pen handpiece, paying close attention to crevices, buttons, and areas where residue might accumulate.
-
Adhere to Contact Time: Allow the disinfectant to remain on the surface for the recommended "contact time" as specified by the disinfectant manufacturer. This is crucial for the disinfectant to effectively kill pathogens. Do not wipe it off prematurely.
-
Air Dry: Allow the derma pen to air dry completely after disinfection. Do not use a towel, as this can reintroduce contaminants.
-
-
Step 3: Storage:
-
Clean and Dry Environment: Once thoroughly disinfected and completely dry, store your derma pen in a clean, dry, and dust-free environment. An airtight container or a designated drawer can help protect it from environmental contaminants.
-
Away from Direct Sunlight: Store it away from direct sunlight and extreme temperatures to preserve its electronic components.
-
Best Practices for Safe Microneedling
Beyond just cleaning the device, adopting a holistic approach to hygiene before, during, and after your microneedling session is crucial for safety and optimal results.
Comprehensive Hygiene Protocols
-
Hand Hygiene: Always wash your hands thoroughly with soap and water before and after handling the derma pen or touching your skin during the procedure. Using disposable gloves is also highly recommended, especially for professional use.
-
Skin Preparation: Prior to microneedling, cleanse the treatment area thoroughly with a gentle cleanser. Then, disinfect the skin with an antiseptic solution like 70% isopropyl alcohol or chlorhexidine, allowing it to air dry completely before beginning the procedure. This removes surface bacteria from the skin itself.
-
Sterile Serums/Products: Ensure any serums or topicals used during or immediately after microneedling are sterile and applied with clean hands or sterile applicators. Avoid using products from open containers that could be contaminated.
-
Avoid Shared Devices: Never share your derma pen with another person. Each individual should have their own device to prevent the transmission of skin conditions or infections. This is a non-negotiable rule for both hygiene and personal safety.
-
Inspect Needles: Before each use, visually inspect the new, sterile needle cartridge for any damage, bent needles, or packaging breaches. If anything looks amiss, discard it and use a new cartridge. A compromised needle can cause unnecessary trauma to the skin.
Adhering to strict derma pen sterilization and hygiene protocols is not just a recommendation; it's a fundamental requirement for safe and effective microneedling. Whether you're performing the treatment at home or receiving it professionally, prioritize cleanliness to protect your skin and maximize your results. A well-maintained and sterilized Derma pen ensures that your journey to healthier, more radiant skin is both rewarding and safe.
Frequently Asked Questions
❓ Can I reuse derma pen needles if I sterilize them thoroughly? Absolutely not. Derma pen needle cartridges are designed for single-use only. Even with thorough sterilization, tiny needle dullness can occur after one use, causing unnecessary skin trauma. More importantly, it's virtually impossible to completely sterilize the intricate mechanisms and microscopic spaces within the needle cartridge at home, making reuse a high risk for infection. Always use a brand-new, sterile needle cartridge for each session.
❓ How often should I clean my derma pen? The derma pen handpiece (the main body, not the needles) should be thoroughly cleaned and disinfected immediately after every single use. This prevents any residue from drying on the device and ensures it's hygienic for its next use. Remember, the needle cartridge is discarded after each session.
❓ Is boiling water or soaking in alcohol enough to sterilize derma pen needles? No, boiling water or soaking in alcohol are not sufficient for sterilizing derma pen needles (which, again, should not be reused anyway). True sterilization requires specialized equipment like an autoclave, which uses high-pressure steam, or certain chemical sterilants not typically available for home use. Attempting to sterilize needles at home is unsafe and ineffective.
For professional microneedling treatments performed with the highest standards of hygiene and safety, or to inquire about proper at-home device care, contact Royal Clinic Saudia.
What's Your Reaction?
 Like
0
Like
0
 Dislike
0
Dislike
0
 Love
0
Love
0
 Funny
0
Funny
0
 Angry
0
Angry
0
 Sad
0
Sad
0
 Wow
0
Wow
0