


How to Install a New Dryer Vent Cover Without a Contractor
Quick and reliable dryer vent cover replacement in Campbell. Improve safety, airflow & energy efficiency. Book your service today!
When your dryer vent cover starts to look battered or lets chilly air sneak into your laundry room, it might be time for a swap. You don’t need to call in a professional for this—replacing a dryer vent cover is something you can tackle on your own with a bit of patience and the right approach. Whether you’re aiming to boost efficiency, keep critters out, or simply give your home’s exterior a tidy look, doing this yourself can save you both cash and hassle. Let’s walk through the steps together so you can breeze through your Dryer Vent Cover Replacement project.
Gathering Your Supplies: What You’ll Need
Before you jump in, it’s helpful to collect everything you’ll need. Most of these items are probably already in your toolbox, and the rest are easy to find at any hardware store. Here’s a quick checklist to get you started:
| Item | Why You Need It |
|---|---|
| New dryer vent cover | The star of the show—pick one that fits your vent opening |
| Screwdriver (Phillips or flat-head) | To remove the old cover and install the new one |
| Caulk and caulking gun | To seal any gaps and block out drafts |
| Utility knife | To trim away old caulk or stubborn debris |
| Work gloves | To protect your hands from sharp edges |
| Step ladder | If your vent is higher up on the wall |
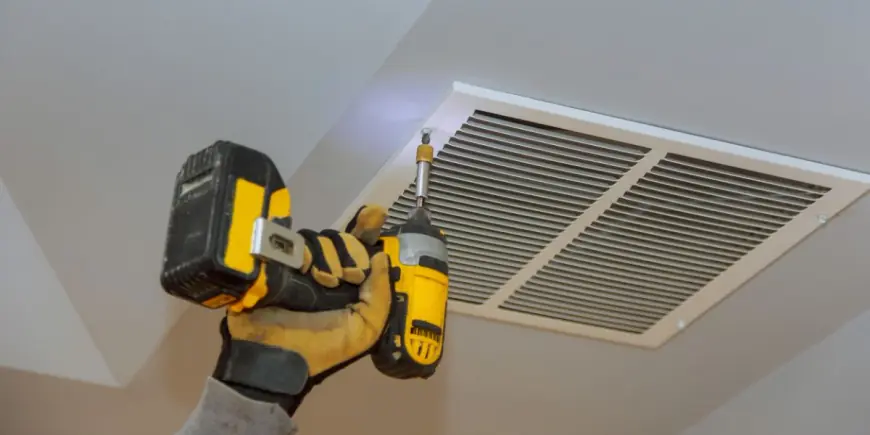
Out With the Old: Removing the Existing Cover
First things first, gently brush away any cobwebs or dirt from around the vent. Slip on your gloves—sometimes the old cover can have sharp corners. Use your screwdriver to loosen and remove the screws holding the cover in place. Set those aside if you plan to reuse them. If the cover is stuck, lightly wiggle it back and forth; older caulk might be holding it tight. For stubborn residue, carefully run your utility knife along the edge to free it. Once it pops off, give the area a quick clean so your new cover will sit flush and secure.
Prepping for Success: Fitting and Sealing the New Cover
Now, grab your shiny new vent cover and make sure it lines up with the old holes or vent opening. Hold it in place and double-check that it sits flat against the wall—this makes sealing easier later on. If the screw holes are different, you may need to mark and drill fresh ones. Once it’s lined up, secure it with the screws, but don’t overtighten; just enough to hold it snug. Next, load your caulk gun and run a bead of caulk around the outer edge. This step is key for keeping out moisture, cold air, and any curious critters looking for a new home.
Final Touches: Checking Your Work
Before you pack up the tools, take a few moments to inspect your handiwork. Make sure the cover opens and closes freely—most have little flaps that should move easily but close tight when not in use. Wipe away extra caulk with a damp cloth for a neat finish. If you had to use a ladder, double-check the stability of your work from the ground. Finally, run your dryer briefly and watch to make sure air is flowing out as it should. That’s it—you’ve just upgraded your home all by yourself!
Extra Insights: What Else Should You Know?
- Key Features: Modern dryer vent covers often come with built-in pest guards, weather-resistant materials, and self-closing flaps that help keep outside air where it belongs.
- Safety: Always unplug your dryer before working near the vent, and take care on ladders or when using sharp tools to avoid injuries.
- Cost: Most vent covers cost between $10 and $25, and you’ll probably spend less than $10 on extra supplies if you don’t have them already. Doing it yourself means you skip hefty contractor fees.
- Emergency Service: If you notice water leaks, animal nests, or severe blockage when removing the old cover, it’s wise to call a professional. Most fixes are simple, but some issues need expert eyes.
- FAQs:
- How often should I check my vent?
- At least once a year.
- Can I paint my cover?
- Yes, as long as you use outdoor-safe paint.
- What if the cover doesn’t fit?
- Double-check measurements before buying, or bring your old cover to the store for comparison.
Installing a new dryer vent cover might seem intimidating at first, but with the right steps and a bit of confidence, it turns into a quick weekend win. Not only will you keep your laundry area tidy and safe, but you’ll also feel the satisfaction of a job well done—all without waiting on a contractor. Remember, little fixes like these are what make your space truly feel like home. Happy DIY-ing!
What's Your Reaction?
 Like
0
Like
0
 Dislike
0
Dislike
0
 Love
0
Love
0
 Funny
0
Funny
0
 Angry
0
Angry
0
 Sad
0
Sad
0
 Wow
0
Wow
0