


What to Include While Writing A Cancelled Cheque For Kyc Verification
When it comes to financial documentation, understanding how to write a cancelled cheque is crucial
When it comes to financial documentation, understanding how to write a cancelled cheque is crucial—especially for Know Your Customer (KYC) verification. Whether you're applying for the Bajaj Finserv Insta EMI Card or any other financial product, a correctly written cancelled cheque helps ensure smooth verification of your bank details.
In this guide, you'll learn how to write a cancelled cheque step-by-step, understand why it is needed, and explore how tools like the Insta EMI Card and iPhone EMI calculator can enhance your financial journey.
What Is a Cancelled Cheque and How to Write One Correctly
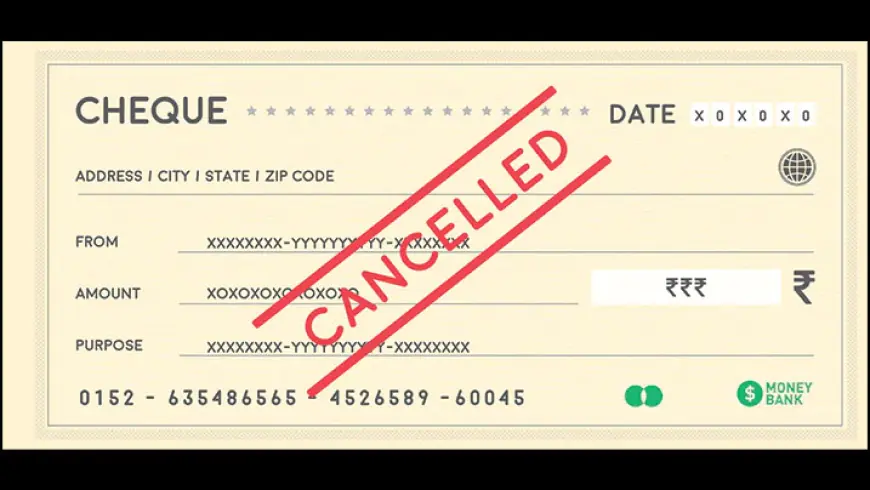
A cancelled cheque is simply a cheque marked with the word "CANCELLED" across it. While it's not used for payment, it verifies key banking information like your name, account number, IFSC code, and MICR code.
Here’s how to write a cancelled cheque correctly:
-
Take a Blank Cheque
Use a clean, unused cheque from your bank account. Ensure it is not damaged or pre-filled.
-
Write 'CANCELLED' Across the Cheque
Write the word “CANCELLED” diagonally across the cheque using a blue or black pen. Make sure it’s clearly visible.
-
Don’t Sign the Cheque
Since the cheque is not used for transactions, do not sign it. This ensures that it can't be misused.
-
Do Not Fill in Other Fields
Leave the payee name, date, and amount fields empty. Only the cancellation marking is needed.
-
Double-Check the Details
Ensure that your bank name, account number, and IFSC code are clearly visible and accurate.
By following these steps, you avoid common errors that could lead to KYC rejections.
Why Is a Cancelled Cheque Required for KYC?
Financial institutions use cancelled cheques to verify your bank account details during KYC. This ensures:
-
Accurate mapping of your bank account
-
Secure fund transfers
-
Eligibility confirmation for credit products
For example, while applying for the Bajaj Finserv Insta EMI Card, a cancelled cheque may be part of the minimal documentation required during onboarding. It proves your ownership of the bank account without authorizing any financial activity.
Top Benefits of the Bajaj Finserv Insta EMI Card
The Bajaj Finserv Insta EMI Card is a smart financing tool that lets you convert large purchases into manageable EMIs with zero interest. Ideal for students, professionals, or families looking to shop efficiently, this card offers:
-
No Cost EMI Facility
Convert your purchases into No Cost EMIs with no extra interest charges. Want to calculate your monthly EMI? Try the iPhone EMI calculator or similar product calculators.
-
Flexible Tenure Options
Choose repayment durations from 3 to 24 months based on your convenience.
-
Pre-approved Limit up to ₹2 Lakhs
Enjoy instant access to a pre-approved loan limit, ideal for big-ticket items like smartphones, home appliances, and more.
-
Widespread Acceptance
Use the Insta EMI Card at 1.5 lakh+ partner stores across India and leading e-commerce platforms.
-
Instant Activation
Get your card instantly activated post-approval, so you can start shopping immediately.
-
Minimal Documentation
Submit just a few documents—including a cancelled cheque—and you're good to go.
-
No Foreclosure Charges
Repay early after your first EMI without any penalty.
How to Apply for the Bajaj Finserv Insta EMI Card
Applying for the Insta EMI Card is simple and quick:
-
Visit the Official Application Page
Go to Bajaj Finserv Insta EMI Card to begin your application.
-
Check Eligibility
Ensure you meet basic requirements like age, income level, and KYC compliance.
-
Fill Out the Form
Enter basic information such as your name, phone number, and employment status.
-
Upload Required Documents
Submit a valid cancelled cheque, PAN card, and address proof.
-
Pay Joining Fee
Make a one-time payment to activate your card immediately.
Once verified, your card will be instantly ready for use—online or in-store.
Use the No Cost EMI Calculator for Smart Budgeting
Before making your next purchase, use the No Cost EMI calculator to estimate monthly payments based on the product cost, tenure, and loan amount. This helps you:
-
Avoid financial surprises
-
Choose the right repayment period
-
Plan purchases based on your monthly budget
Whether you’re buying a phone, laptop, or home appliance, the EMI calculator gives you clarity and control.
Final Thoughts
Understanding how to write a cancelled cheque is more important than it might seem. It’s a small but essential step for smooth KYC verification when applying for financial products like the Bajaj Finserv Insta EMI Card.
The Insta EMI Card offers unmatched convenience with No Cost EMIs, wide acceptance, flexible tenure, and a hassle-free application process. When paired with tools like the iPhone EMI calculator, it empowers you to shop smartly and manage finances with ease.
What's Your Reaction?
 Like
0
Like
0
 Dislike
0
Dislike
0
 Love
0
Love
0
 Funny
0
Funny
0
 Angry
0
Angry
0
 Sad
0
Sad
0
 Wow
0
Wow
0