


Lippan Art Materials List You Need Before Starting Your First Lippan Art Kit
But before you open your first Lippan art kit or attempt a homemade design, you should know exactly what goes into this craft. A complete Lippan art materials list makes your first project smoother, faster, and way more enjoyable.
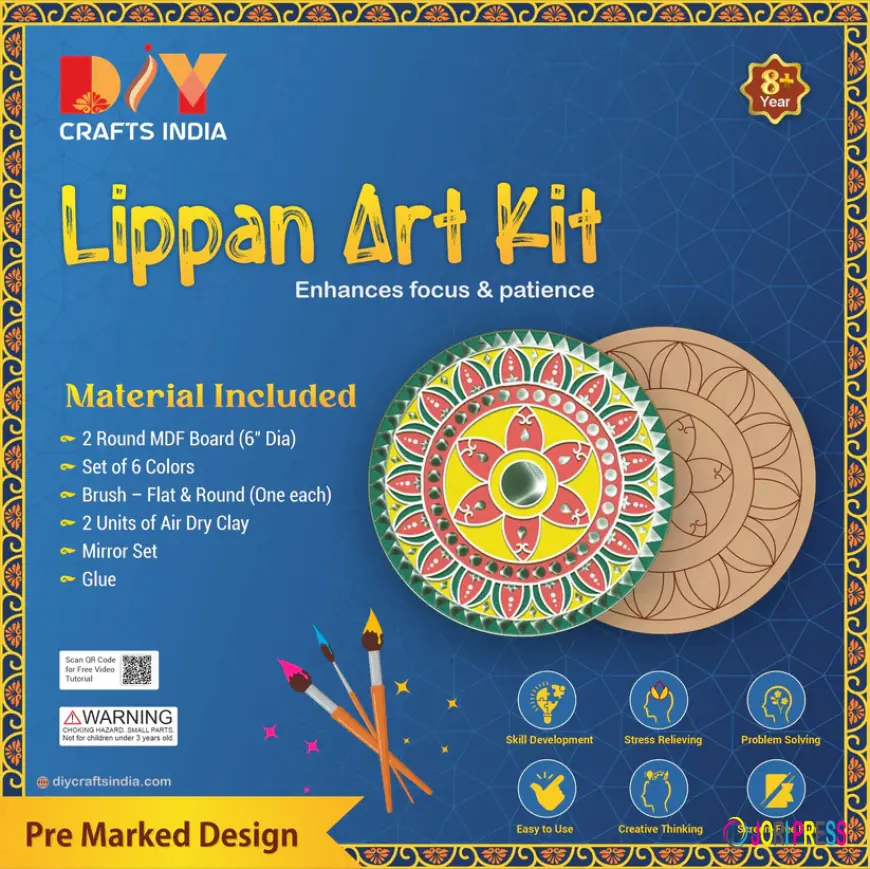
Lippan art kit
If you’ve recently found yourself staring at those beautiful clay-and-mirror artworks on Instagram and thinking, “I wish I could try this,” you’re not alone. Lippan Art has made a big comeback, especially among DIY lovers who enjoy slow, mindful crafting. And the best part? You don’t need years of practice to create something stunning.
But before you open your first Lippan art kit or attempt a homemade design, you should know exactly what goes into this craft. A complete Lippan art materials list makes your first project smoother, faster, and way more enjoyable.
This guide is designed for beginners who want to understand the materials, why they’re used, and how to pick the right ones for a successful first try.
Let’s get started.
What Is Lippan Art and Why Materials Matter
Lippan Art (also known as Mud Mirror Work) comes from the Kutch region of Gujarat. Traditionally, it was created on home walls using mud and tiny reflective mirrors. Today, it has become a modern craft you can do from any home—no mud walls required.
While the technique is simple, the choice of materials makes a huge difference. The right clay will help you roll clean shapes. The right mirrors will elevate your design instantly. And the right board ensures your artwork lasts for years.
Think of it like cooking. You can make a dish with whatever is lying around… but when the ingredients are fresh and measured right, the experience feels completely different.
Why Beginners Love DIY Lippan Art Kits
Before jumping into the materials list, it’s worth mentioning why so many beginners start with a Lippan art kit.
A kit removes the guesswork.
No need to hunt for mirrors in the right size.
No need to figure out how much clay to buy.
Everything arrives in one neatly assembled box. This also ensures your first try doesn’t feel overwhelming.
But even if you're buying a kit, understanding each material makes the process smoother. You’ll know what you're using and why you're using it—which always leads to better results.
The Complete Lippan Art Materials List (Beginner-Friendly)
Here is the essential list of everything you need before starting your first artwork. Whether you use a kit or collect supplies individually, this is the foundation.
1. Clay (Air-Dry Clay or Mouldit Clay)
Clay is the heart of Lippan Art. Traditionally, artisans used natural mud, but today we prefer air-dry clay or Mouldit clay because it's cleaner, smoother, and durable.
Why beginners love it:
It rolls easily into ropes, holds shape well, and dries without cracking when used correctly.
Pro tip:
Don’t rush drying. Give the clay enough time to set. This avoids unnecessary cracks or shrinkage.
2. MDF Board (Base Board)
Your artwork needs a strong, flat base. MDF is the most popular choice because it doesn’t warp or absorb moisture.
Common shapes include:
-
Square boards
-
Round boards
-
Rectangular boards
-
Decorative cutouts (mandalas, jharokhas, floral shapes)
Beginners usually start with a 6–8 inch board. It’s small enough to finish in a day yet detailed enough to look impressive.
A good MDF board makes or breaks your Lippan Art. Always choose one with smooth edges and consistent thickness.
3. Mirrors (Assorted Shapes)
If clay is the heart of Lippan Art, mirrors are the soul. They bring sparkle, depth, and that signature Kutch vibe.
You can use:
-
Round mirrors
-
Square mirrors
-
Diamond mirrors
-
Lotus-shaped mirrors
-
Teardrop mirrors
-
Mini mosaic mirrors
A standard lippan art kit usually includes a mixed set so beginners don’t have to worry about selecting shapes.
Tip:
Try placing mirrors first on your design before sticking them. It helps you visualize your layout.
4. Adhesive / Glue
Good glue matters more than beginners realize. It holds both the clay and mirrors in place.
Suitable options include:
-
Craft glue
-
Fevicol
-
Strong adhesive gels (for heavier pieces)
Don’t over-apply. Extra glue around mirrors dries unevenly and can affect the final look.
5. White Primer or Base Coat
A base coat creates a clean surface for your artwork. It also prevents MDF from absorbing the glue.
Most beginners use:
-
White acrylic paint
-
Gesso primer
-
Chalk paint (optional)
White makes the mirrors shine brighter. If you want a colorful background, you can experiment later. For your first try, stick to white.
6. Optional Tools (But Helpful for Beginners)
You don’t need tools, but certain small tools make your craft neater:
-
Clay cutter for trimming shapes
-
Rolling pin to flatten clay
-
Dotting tools for uniform impressions
-
Compass or ruler for symmetry
Many people stick to just their hands—and that’s perfectly fine. Lippan Art is deeply tactile.
How These Materials Come Together in a Lippan Art Kit
A well-designed Lippan art kit usually contains:
-
Ready-to-use clay
-
Mixed mirror set
-
MDF board (pre-cut)
-
Adhesive
-
Instructions or design ideas
The idea is simple: remove confusion and set you up for success.
When everything is placed in one kit, beginners find the process less intimidating and more enjoyable. You simply open the box, follow your inspiration, and start rolling clay.
How to Use Your Lippan Art Materials Step-by-Step
Once you have your materials ready, here’s the beginner-friendly method most people follow.
Start with your MDF board. Paint it with white primer. Let it dry.
Sketch a light design. Even simple flowers or circles can look professional.
Roll thin clay ropes. Keep them even. This small detail affects the entire artwork.
Place the clay along your pencil outline, pressing gently as you go.
Add mirrors to key points—centres, corners, symmetrical borders.
Let everything dry naturally. No heat guns, no rushing.
Optional: Add a coat of pearl or metallic paint to highlight patterns.
The magic lies in how clay and mirrors complement each other. Even simple shapes become stunning once the glue dries and the mirrors catch the light.
Common Mistakes Beginners Make (And How to Avoid Them)
Your clay ropes may look uneven.
Your mirrors may not line up perfectly.
Your board might dry slower than expected.
All normal. All fixable.
Here are simple tips:
Keep a bowl of water nearby. Slightly damp fingers help in smoothing clay.
Plan your design before sticking anything.
Work in small sections so your clay doesn’t dry out too fast.
Remember, Lippan Art is meant to be slow and calming. Rushing spoils the fun.
Why Understanding the Lippan Art Materials List Helps You Improve Faster
A lot of DIY hobbyists skip this step and directly jump into crafting. But knowing your materials—how they feel, how they behave, how long they take to dry—changes everything.
You’ll create cleaner lines.
Your clay won’t crumble.
Your mirrors will sit neatly in place.
Once you understand the role of each material, creating bigger and more detailed pieces becomes incredibly easy.
Final Thoughts
Starting your first Lippan project should be exciting, not confusing. With the right Lippan art materials list, you know exactly what to expect—and with the right Lippan art kit, you have everything in one place.
Whether you're creating a small decorative coaster or your first wall piece, remember that Lippan Art is less about perfection and more about the joy of creating something with your hands. Once you complete your first artwork, you’ll feel a level of satisfaction that only handcrafted pieces can give.
Start small. Start simple. But start today.
FAQs
1. What materials do I need for my first Lippan Art project?
Clay, mirrors, MDF board, glue, and a white base coat are the essentials.
2. Is a Lippan art kit good for beginners?
Yes. Kits include all materials in one place, making the process easier.
3. Which clay is best for Lippan Art?
Air-dry clay and Mouldit clay are the most popular choices because they’re easy to roll and long-lasting.
4. Do I need tools for Lippan Art?
Tools are optional. Your hands can create most shapes.
5. Can the artwork be painted after finishing?
Yes. You can add metallic, pearl, or pastel colours once the clay dries.
What's Your Reaction?
 Like
0
Like
0
 Dislike
0
Dislike
0
 Love
0
Love
0
 Funny
0
Funny
0
 Angry
0
Angry
0
 Sad
0
Sad
0
 Wow
0
Wow
0