


192.168.1.250 Default IP for NETGEAR WiFi Extender Setup
There are several methods to install and manage the Netgear extender settings: like IP address, login URL, Nighthawk app, and easiest WPS. But here we are discussing about how to IP address 192.168.1.250 helps you to complete the setup of the Netgear extender.
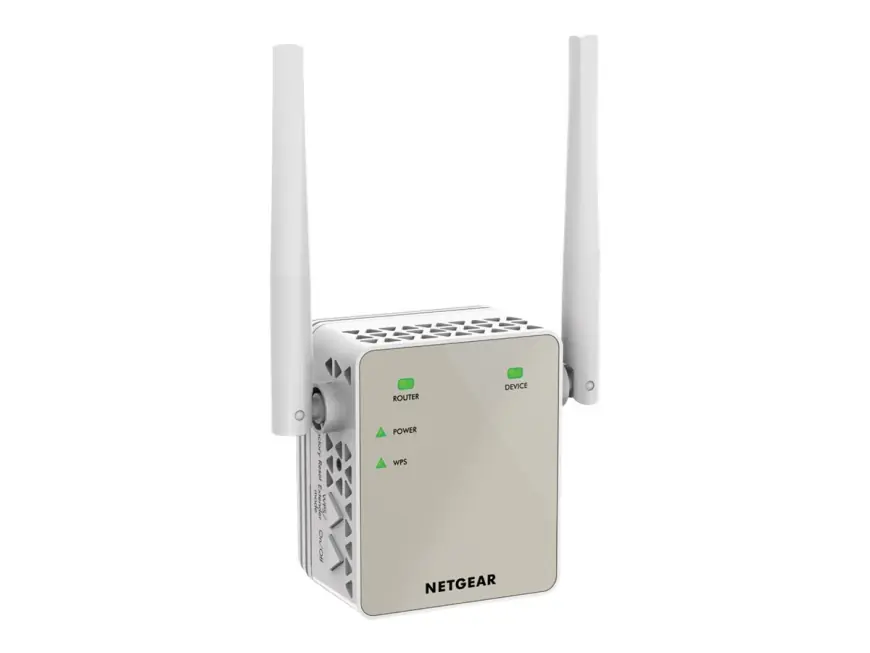
Netgear Extender Setup via 192.168.1.250
1. Plug the extender into an outlet that’s, like, halfway between your router and the dead zone. Don’t shove it all the way in the garage or upstairs corner yet. Start closer.
2. Wait until the power light goes solid. Then on your laptop or phone, check your WiFi list. You should see something like NETGEAR_EXT.
3. Connect to that. No password, at least not at this stage. Now open a browser. Just enter in: 192.168.1.250. If that doesn’t load, try mywifiext.net instead.
4. You should land on the Netgear setup wizard. If it asks you to log in, the default is usually:
· Username: admin
· Password: password
5. Once you’re in, it’ll scan for your main WiFi networks. Pick your router’s WiFi name (SSID).
6. Type in your WiFi password. there it will ask, if you want to extend 2.4GHz, 5GHz, or both—go with both if your router supports it.
7. Then, it’ll spit out a new network name like: Your Network Name_EXT
That’s the extender’s WiFi. Connect to it. Make sure you can load a page (Google or whatever). If it loads, congrats—it’s working.
Nighthawk App for Extender Setup
The Netgear nighthawk login doesn’t work just, Download the Nighthawk app on your phone. iOS or Android, doesn’t matter. Make sure you’re connected to your home WiFi (the main router) before you even start, otherwise the app just sits there and gets confused.
· When you plug in the extender, give it like a solid minute. The lights blink all over the place at first.
· Once you see a steady power light, open the app. It’ll try to detect your device. The app will walk you through connecting the extender to your main router.
· It’ll show the networks, you pick yours, enter the WiFi password. Here’s the catch: if you have separate 2.4GHz and 5GHz bands, the app will make you set both up. Do it.
· Once it’s linked, the extender will spit out a new WiFi name. Usually your network name with “_EXT” at the end.
· After that, connect your phone or laptop to the extender’s network, and boom — you’ve got coverage in that dead zone.
The Easiest Way: WPS
Plug in the extender. Outlet near your router first, not halfway across the house. You just want them close while pairing.
· Wait for the power light. Takes a minute or two sometimes. If it’s not solid, don’t start pressing stuff.
· Find the WPS button on the extender. Usually, a little round one on the side or front.
· Hit WPS on the extender. Light should start blinking. It means the extender is finding the router for the connection.
· Within 2 minutes, hit WPS on your router. Different brands put it in different spots, usually on the back. Same deal: hold for a second, let go.
· Watch the lights. Extender WPS light should go solid after a bit. Then you’ll see the router or link light lock in. If it goes red or just keeps blinking forever, restart and try again.
· Check your WiFi list. You’ll usually see a new network with “_EXT” at the end of your normal WiFi name.
· That’s your extender. Connect to it with the same password you use for your main WiFi.
If the router is not configured, go to the Netgear router login interface and configure it first then do the WPS thing.
Move the extender. Once it’s paired, unplug it and move it about halfway between your router and the dead zone. Plug it in, wait for it to boot, check the signal. Don’t put it right at the edge of coverage, you want it where it still gets decent signal from the router.
Some Troubleshooting Tips
· If the app keeps failing, try setting it up with a browser instead. Just go to mywifiext.net while connected to the extender. Old school, but it works.
· Don’t stick the extender too far from the router. Middle ground is best. Too close and it’s pointless, too far and it won’t connect right.
· Restart your phone if the app refuses to recognize the extender.
· Restart the extender and try again.
· Make sure your router isn’t hiding the SSID.
· If the IP 192.168.1.250 won’t load at all, reset the extender (tiny button on the side, hold for ~10 sec with a paperclip).
The End Lines
Hope, this article have helped you to make the Netgear extender connection with your router via IP address 192.168.1.250 and you now connected with the extended network.
What's Your Reaction?
 Like
0
Like
0
 Dislike
0
Dislike
0
 Love
0
Love
0
 Funny
0
Funny
0
 Angry
0
Angry
0
 Sad
0
Sad
0
 Wow
0
Wow
0